Introduction
Every autumn, as the days shorten and the air turns crisp, gardeners face a critical question: what needs to happen before the first hard freeze to protect the plants, beds, and infrastructure I have spent all season building? The answer, it turns out, is quite a lot. But it is manageable, and the work you do in the weeks before winter arrives determines whether your garden emerges healthy and vigorous in spring or struggles through losses that could have been prevented.
Winter preparation is not just about surviving cold temperatures. It is about understanding how freezing and thawing cycles damage roots, how desiccating winter winds kill evergreen foliage, how ice sitting on crowns rots perennial buds, and how unprotected soil erodes and compacts over the dormant months. It is also about taking advantage of winter to improve your soil, plan next year's layout, maintain your tools, and set yourself up for the most productive season yet.
This guide covers everything you need to know to prepare your garden for winter, from understanding your hardiness zone and frost dates to specific protection methods for perennials, raised beds, tender plants, trees, and shrubs. Whether you are in zone 4 facing months of subzero temperatures or in zone 8 dealing with occasional frost, the principles are the same. The details just change with your climate.
Understanding Frost Dates and Hardiness Zones
Before you can prepare for winter, you need to know what winter looks like in your specific location. Two pieces of information are essential: your USDA Plant Hardiness Zone and your average first and last frost dates.
USDA Plant Hardiness Zones
The USDA Plant Hardiness Zone Map divides North America into 13 zones based on average annual minimum winter temperature. Each zone represents a 10-degree Fahrenheit range, and each is subdivided into "a" and "b" halves for 5-degree precision. Your zone determines which perennial plants, trees, and shrubs can survive your winter outdoors without protection.
| Hardiness Zone | Minimum Winter Temp | Protection Needed |
|---|---|---|
| Zone 3 | -40 to -30°F | Heavy protection for all perennials; most plants need insulation or indoor overwintering |
| Zone 4 | -30 to -20°F | Heavy mulching; wrap tender shrubs; cold frames essential for extending season |
| Zone 5 | -20 to -10°F | Moderate protection; mulch perennials; wrap marginally hardy shrubs |
| Zone 6 | -10 to 0°F | Mulch tender perennials; protect rose crowns; cold frames for winter greens |
| Zone 7 | 0 to 10°F | Light protection; mulch marginally hardy plants; row covers extend harvest |
| Zone 8 | 10 to 20°F | Minimal protection; cover tender crops during frost warnings; many crops overwinter |
| Zone 9 | 20 to 30°F | Frost cloth for occasional freezes; year-round growing possible with protection |
| Zone 10+ | 30°F+ | Rare frost protection; focus on heat management and seasonal crop rotation |
Frost Dates
Your average first fall frost date is the single most important date for winter preparation. This is the date when you can expect the first temperature drop to 32°F or below. All tender annual crops will be killed by this frost, and preparation for winter should be complete before it arrives. Your local cooperative extension service provides frost date data specific to your area, or you can look up your zip code at the Old Farmer's Almanac website.
Keep in mind that frost dates are averages. A killing frost can arrive two to three weeks before or after the average date. Monitor weather forecasts starting in mid-fall and be ready to take emergency protective measures if an early freeze threatens. The first frost is often followed by several weeks of milder weather, which is why having row covers and frost cloth on hand lets you extend the harvest well past the first frost date.
When to Start Preparing
Winter preparation is not a single weekend project. It unfolds over several weeks as temperatures drop and the garden transitions from active growth to dormancy.
- 6 weeks before first frost: Begin cleaning up spent annual crops. Harvest remaining warm-season vegetables. Start hardening off any plants you plan to move indoors. Begin saving seeds from heirloom varieties.
- 4 weeks before first frost: Plant garlic and spring-blooming bulbs. Apply fall fertilizer to perennials and lawns. Begin reducing watering frequency as temperatures cool.
- 2 weeks before first frost: Move tender container plants indoors. Harvest remaining green tomatoes and peppers. Drain and store irrigation systems in freezing climates. Begin mulching perennial beds.
- At first frost: Remove dead annual foliage after it is killed by frost. Apply final mulch layer to perennial beds. Wrap or protect tender shrubs and marginally hardy plants. Install cold frames and row covers over winter crops.
- After ground freezes: Apply additional winter mulch to prevent frost heaving. Disconnect and store rain barrels. Clean, sharpen, and store garden tools. Begin spring planning.
Protecting Perennials
Perennial plants are the backbone of a garden, and protecting them through winter ensures they return strong year after year. The level of protection depends on the plant's hardiness relative to your zone.
Mulching for Winter Insulation
Mulch is the single most effective winter protection for perennials. A four-to-six-inch layer of straw, shredded leaves, pine needles, or wood chips applied after the ground has begun to freeze insulates the soil and prevents the damaging freeze-thaw cycles that push plants out of the ground (frost heaving). This is especially critical in zones 4 through 6, where winter temperatures fluctuate frequently around the freezing point.
Wait until the ground has started to freeze before applying winter mulch. If you mulch too early, you insulate the soil while it is still warm, which can delay dormancy and encourage continued soft growth that is extremely vulnerable to cold damage. The goal is to keep the soil frozen steadily, not to keep it warm. After the first hard freeze, apply a thick layer of straw or shredded leaves over the crowns of perennials like hostas, daylilies, coral bells, and ornamental grasses.
For more on choosing the right mulch for each area of your garden, our guide on choosing the right mulch covers the options in detail.
Mounding and Wrapping
Rose bushes, particularly hybrid teas and floribundas, benefit from mounding soil or compost six to eight inches high over the bud union (the swollen area where the graft meets the rootstock). This protects the most vulnerable part of the plant from extreme cold. In zones 5 and below, add an additional layer of straw or leaves over the mound and wrap the entire plant in burlap to shield it from desiccating winter winds.
Hydrangeas, especially the bigleaf varieties (Hydrangea macrophylla), form their flower buds in fall for the following summer. If those buds are killed by cold, you get no blooms next year. Protect them by wrapping the entire plant loosely in burlap and stuffing the interior with straw or shredded leaves. The burlap breaks the wind and the straw provides insulation. Remove the wrapping in spring after the last hard frost.
Evergreen Protection
Broadleaf evergreens like rhododendrons, azaleas, boxwood, and holly lose moisture through their leaves all winter. When the ground is frozen, roots cannot replace that lost moisture, and the result is desiccation damage: brown, crispy leaf edges and dieback. Protect vulnerable evergreens by wrapping them in burlap screens on the windward side (usually north and west), applying a thick layer of mulch over the root zone, and watering deeply before the ground freezes so the plant goes into winter with maximum moisture reserves.
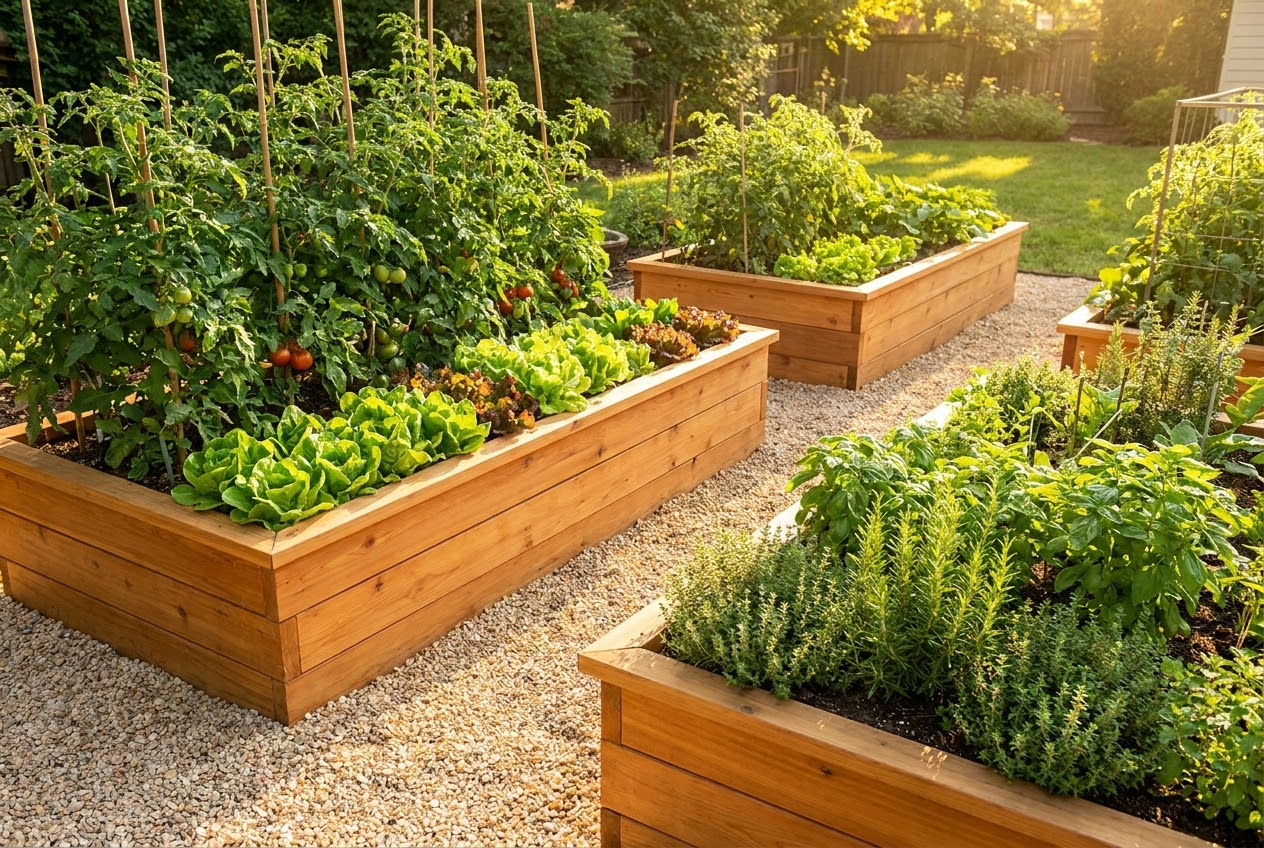
Winterizing Raised Beds
Raised beds need special attention in winter because their elevated soil is exposed to freezing air on all sides, unlike in-ground beds where the surrounding earth provides some insulation.
Empty Beds
After harvesting the last crops, remove dead plant debris (but leave roots in the soil to decompose and feed soil life). Spread a two-to-three-inch layer of compost over the surface. Cover with four to six inches of straw, shredded leaves, or chopped garden waste. This mulch protects the soil from erosion, prevents nutrient leaching from winter rain and snow, feeds earthworms and soil organisms, and is ready to be incorporated in spring with minimal effort. Our guide on raised bed gardening covers year-round bed management.
Beds with Perennials
Raised beds containing perennial herbs, strawberries, or other overwintering plants need extra mulch because the elevated soil is more vulnerable to deep freezing. Apply a thicker mulch layer (six to eight inches) over the crowns of perennial plants. In zones 4 and 5, consider wrapping the exterior of the raised bed with bubble wrap or burlap for additional insulation. Some gardeners place straw bales around the outside of raised beds as a simple, effective windbreak and insulation layer.
Cover Crops
If you have a long fall window before hard freezes, planting a cover crop in raised beds is one of the best things you can do for your soil. Winter rye, crimson clover, or winter peas germinate quickly in fall, establish roots that hold the soil in place, and can be turned under in spring as green manure. In mild climates (zones 7 and above), cover crops grow through winter and provide substantial biomass by spring planting time. Our clay soil improvement guide discusses cover cropping as a soil-building strategy.
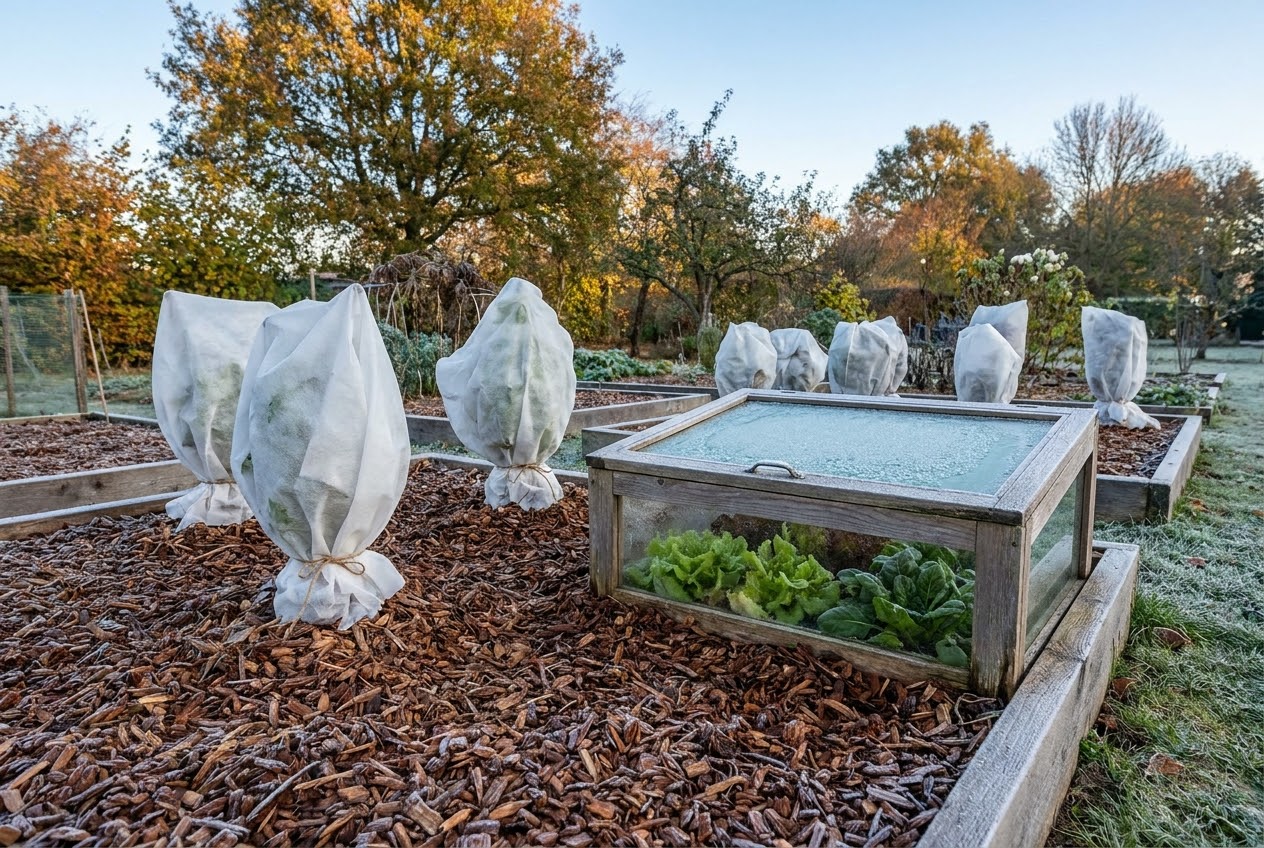
Cold Frames and Row Covers
These simple structures extend your growing season by weeks or even months, allowing you to harvest fresh greens through winter in many climates.
Cold Frames
A cold frame is essentially a bottomless box with a transparent lid, usually made from an old window or a sheet of polycarbonate. It sits over a garden bed and traps solar heat, creating a microclimate that is 10 to 20 degrees warmer than the outside air. Cold frames are ideal for overwintering lettuce, spinach, kale, arugula, and other cold-hardy greens in zones 5 through 8.
You can build a simple cold frame from a wooden frame and an old window sash for under $30. Angle the lid to face south for maximum sun exposure. On sunny days above 40°F, prop the lid open to prevent overheating. Close it in the late afternoon to trap warmth for the night. In extremely cold weather, cover the cold frame with an old blanket or straw for extra insulation.
Row Covers
Row covers are lightweight fabric draped over hoops or directly over plants. They come in different weights: lightweight (0.5 oz/sq yd) provides frost protection to about 28°F, medium weight (1.0 oz/sq yd) protects to 24°F, and heavy weight (1.5 to 2.0 oz/sq yd) protects to 20°F or below. Row covers transmit sunlight and rain while trapping heat and blocking wind. They are the simplest, cheapest way to extend the harvest of cold-hardy crops by four to eight weeks in fall and start them two to four weeks earlier in spring.
Install row covers over wire hoops bent into a U-shape and pushed into the soil along the edges of your bed. Drape the fabric over the hoops and secure the edges with soil, rocks, or sandbags. Make sure the cover is loose enough to allow plant growth underneath. Check periodically for tears and repair with duct tape or fabric patches.
| Winter Protection Method | Protection Level | Cost | Best For | Difficulty |
|---|---|---|---|---|
| Winter Mulching | Moderate (insulates roots) | Free–$30 | Perennial beds, raised beds, crowns of tender plants | Easy |
| Burlap Wrapping | Moderate–High (wind & cold) | $10–$25 | Evergreens, roses, hydrangeas, marginally hardy shrubs | Easy |
| Cold Frames | High (10–20°F above ambient) | $30–$150 | Winter greens, season extension, hardening off seedlings | Moderate |
| Row Covers (Frost Cloth) | Moderate–High (4–12°F protection) | $15–$40 | Extending harvest of cold-hardy crops, protecting late-season plantings | Easy |
| Mounding Soil/Compost | Moderate (protects bud unions) | Free–$15 | Rose grafts, perennial crowns, bulb beds | Easy |
| Bubble Wrap Insulation | Moderate (raised bed walls) | $10–$20 | Raised bed exteriors, container insulation | Easy |
| Greenhouse/High Tunnel | Very High (year-round growing) | $200–$5,000+ | Year-round production, overwintering tender plants | Advanced |
| Heat Cables/Mats | High (targeted root zone warmth) | $30–$80 | Overwintering container perennials, greenhouse benches | Moderate |
Overwintering Tender Plants
Some plants cannot survive your winter outdoors but are too valuable or too large to simply discard. These require special care to carry through the dormant season.
Tropical and Subtropical Plants
Bougainvillea, hibiscus, citrus, plumeria, and other tropical plants grown in containers should be moved indoors before the first frost. Place them in a bright, cool room (55 to 65°F is ideal) and reduce watering significantly. Most tropicals go semi-dormant in winter and need much less water than during active growth. Mist foliage occasionally to combat the dry air from indoor heating. Avoid placing them near heating vents or drafty windows.
Dahlias, Cannas, and Gladiolus
These tender bulbs and tubers are not cold-hardy in most of the country. After the first frost kills the foliage, cut the stems to four to six inches and carefully dig up the tubers or corms. Let them dry in a cool, airy place for a few days, then pack them in slightly damp peat moss, vermiculite, or sawdust in a cardboard box. Store in a cool (40 to 50°F), dark, dry place. Check monthly and mist lightly if the packing material is bone dry. Replant in spring after the last frost.
Herbs
Tender herbs like rosemary, lemongrass, and bay laurel can be potted up and brought indoors for winter. Place them in the sunniest window you have and water sparingly. Hardy herbs like thyme, sage, oregano, and chives survive winter outdoors in most zones but benefit from a light mulch covering after the ground freezes. Our guide on growing herbs indoors year-round covers the transition from outdoor to indoor growing in detail.
Container Perennials
Perennials in containers are more vulnerable to cold than those in the ground because the soil in pots freezes faster and more completely. In zones 5 and below, most perennial containers need winter protection. Options include moving pots to an unheated garage or shed, burying the pots in the ground up to the rim, grouping pots together against a sheltered wall and wrapping them in burlap, or wrapping individual pots in bubble wrap and stacking straw bales around them for insulation.
Winter Care for Trees and Shrubs
Trees and shrubs represent years of growth and the largest investment in your landscape. Protecting them through winter preserves that investment.
Anti-Desiccant Sprays
Spray broadleaf evergreens (boxwood, holly, rhododendron, mountain laurel) with an anti-desiccant product in late fall before the first hard freeze. These products coat the leaves with a thin, waxy film that reduces moisture loss through transpiration. Reapply in midwinter during a warm spell if possible. Anti-desiccants are especially important for plants in exposed, windy locations.
Wrapping Young Trees
Young trees with thin bark are susceptible to sunscald, a condition where winter sun warms the bark during the day, followed by rapid freezing at night, causing the bark to crack and split. Wrap the trunks of young maples, cherries, plums, and other thin-barked trees with tree wrap or plastic tree guards from the ground to the first major branching. Apply in fall and remove in spring after the last hard frost.
Protecting from Snow and Ice Damage
Heavy, wet snow and ice accumulation can break branches, especially on multi-stemmed shrubs and evergreens with horizontal branching like arborvitae and juniper. Before a heavy snowstorm, gently brush accumulated snow off branches with a broom, sweeping upward to lift the weight. Do not try to break ice off branches; the force will snap the wood. Instead, let ice melt naturally. For shrubs prone to splaying under snow load, tie the stems together loosely with twine or cloth strips in fall.
Winter Watering
In regions with dry winters (particularly the western United States), evergreens and newly planted trees and shrubs may need supplemental water during extended dry periods when the ground is not frozen. A deep watering once a month during winter warm spells prevents the desiccation damage that kills more winter plants than cold itself. If you have a drip irrigation system, disconnect it for winter to prevent freeze damage, and hand-water as needed.
Tool Maintenance and Storage
Winter is the ideal time to care for the tools that carried you through the growing season. A few hours of maintenance in fall saves frustration and money in spring.
Cleaning
Remove soil, sap, and plant residue from all tools with a stiff brush or steel wool. Wash with soapy water and dry thoroughly to prevent rust. Disinfect pruning tools by soaking the blades in a solution of one part bleach to nine parts water for 10 minutes, then rinse and dry. This kills plant pathogens that may be lingering on the blades from fall pruning.
Sharpening
Sharpen pruners, loppers, hedge shears, and shovels with a mill file or whetstone. A sharp blade makes cleaner cuts that heal faster on plants, and it requires less effort to use. File in one direction, following the existing bevel angle. A few passes are usually enough. Our guide on garden health and maintenance covers tool care as part of overall garden hygiene.
Rust Prevention
After cleaning and sharpening, wipe metal surfaces with a light coat of oil (linseed oil, mineral oil, or even WD-40) to prevent rust during storage. Sand and oil wooden handles to prevent splintering. Hang tools on hooks or racks rather than leaving them on the floor where moisture accumulates.
Storing Hoses and Irrigation
Drain all water from garden hoses, sprinklers, and irrigation systems. Coil hoses and store them in a garage or shed. In freezing climates, disconnect rain barrel spigots and drain barrels completely. Water expands when it freezes and can crack plastic and metal fittings. Store timers indoors and remove batteries.
Planning for Spring
Winter is the gardener's off-season, but it is not idle time. The dormant months are perfect for reflection, planning, and preparation that makes the next growing season your best yet.
Review the Past Season
Go through your garden notes (you did keep notes, right?) and assess what worked, what failed, and what you want to change. Which varieties performed well? Which had disease or pest problems? Where did you have space that could be used more efficiently? What new techniques or crops do you want to try? This honest evaluation is the foundation of continuous garden improvement.
Design Next Year's Layout
Sketch your garden plan for next year, practicing crop rotation by moving plant families to different beds. Tomatoes, peppers, eggplant, and potatoes (Solanaceae) should not grow in the same bed two years in a row. The same goes for brassicas (cabbage, broccoli, kale), cucurbits (squash, cucumbers), and legumes (beans, peas). Rotating crops breaks pest and disease cycles and balances soil nutrient depletion.
Order Seeds Early
Popular seed varieties sell out quickly. Place your seed orders in January or February for the best selection. While you are browsing catalogs, look for disease-resistant varieties, regionally adapted cultivars, and new introductions that might solve problems you encountered this year.
Start Indoor Seed Starting Prep
Gather seed starting supplies: trays, pots, seed starting mix, grow lights, and heat mats. Clean and disinfect any reused containers. Test grow light bulbs and replace any that are dimming. The first indoor seedings (onions, leeks, celery) begin 10 to 12 weeks before the last frost date, which is late January or February for many gardeners.
Build or Repair Infrastructure
Winter is the time to build raised beds, repair fences, sharpen mower blades, fix trellises, and construct cold frames and row cover hoops. Lumber and hardware are often discounted in winter, and the work is comfortable in cool temperatures. Having infrastructure ready when spring arrives means you can focus on planting instead of building.
Emergency Frost Protection
Sometimes an unexpected frost arrives before you have completed your winter preparation. Here is what to do when temperatures threaten to drop below freezing on short notice.
- Cover tender plants. Old bed sheets, towels, cardboard boxes, and plastic sheeting all work as emergency frost covers. Drape them over plants before sunset and remove them in the morning after temperatures rise above freezing. The cover traps heat radiating from the ground, keeping the air around the plant several degrees warmer.
- Water the soil. Wet soil holds heat better than dry soil. Water garden beds thoroughly before a frost event. The heat released as water cools and eventually freezes actually protects plants from the worst cold damage.
- Move containers. Potted plants can be moved to sheltered locations: against the house wall, under an overhang, into a garage or shed. Even moving them from an exposed area to a sheltered one can make a 5 to 10 degree difference.
- Harvest what you can. If protection is not possible, harvest all ripe and nearly ripe fruits and vegetables before the frost hits. Green tomatoes will ripen indoors on a windowsill. Peppers, eggplant, and squash can be used at any stage of ripeness.
Frequently Asked Questions
Should I cut back perennials in fall or leave them standing for winter?
This depends on the plant. Cut back perennials that are prone to fungal diseases (like peonies with botrytis or iris with leaf spot) to remove infected foliage. Leave sturdy, upright perennials like coneflower, black-eyed Susan, sedum, and ornamental grasses standing through winter. Their seed heads feed birds, their stems trap insulating snow around the crown, and they add architectural interest to the winter garden. Cut them back in early spring before new growth emerges.
When should I stop watering my garden in fall?
Continue watering until the ground freezes. Plants, especially evergreens, need to go into winter with fully hydrated roots. A deep watering in late fall, just before the ground freezes, is one of the best things you can do for trees, shrubs, and perennials. After the ground is frozen, supplemental watering is unnecessary for dormant plants (except in dry western climates where winter watering is needed during warm spells).
Can I plant anything in the garden during winter?
In zones 7 and above, you can plant cool-season crops like lettuce, spinach, kale, and peas through winter using cold frames, row covers, or greenhouses. In colder zones, winter is dormant for outdoor planting, but you can start seeds indoors under grow lights beginning 10 to 12 weeks before your last frost date. Garlic is traditionally planted in fall and overwinters in the ground, emerging in early spring. Our guide on starting a vegetable garden covers seasonal planting timing.
How do I protect my raised bed garden from freeze-thaw cycles?
Raised beds are more susceptible to freeze-thaw damage because the soil is exposed to cold air on all sides. Apply a thick layer (six to eight inches) of insulating mulch over the entire bed surface after the ground begins to freeze. Wrap the exterior walls of the bed with bubble wrap or straw bales for additional insulation. Avoid walking on frozen raised bed soil, which compacts the structure. Consider planting a cover crop in fall to hold the soil in place over winter.
Is it too late to protect my plants if the first frost has already happened?
No, but act quickly. If the first frost was a light frost (32 to 28°F) and killed only tender annuals, you still have time to protect perennials, wrap shrubs, and apply winter mulch before the next cold event. If the frost was a hard freeze (below 28°F), some damage to marginally hardy plants may already be done, but protecting them now prevents further damage from the deeper cold of midwinter. The best time to prepare is before the first frost, but the second-best time is right now.
Conclusion
Winter preparation is an investment in your garden's future. The mulch you spread protects perennial crowns from frost heaving. The burlap you wrap prevents wind desiccation on your evergreens. The cold frame you build extends your harvest by months. The tools you clean and sharpen are ready for action when spring returns. Each task is simple, but together they add up to a garden that survives winter gracefully and emerges in spring ready to grow.
Do not try to do everything in one weekend. Spread the work over several weeks, matching your tasks to the calendar and the weather. Start with the most critical items: harvesting tender crops, moving containers indoors, and protecting marginally hardy plants. Then work through the secondary tasks: mulching beds, cleaning tools, draining irrigation. By the time the ground freezes, your garden will be ready for whatever winter throws at it.
And when spring arrives and your neighbors are surveying winter damage and starting from scratch, your garden will be already ahead, with protected perennials pushing up vigorous new growth, soil enriched by winter mulch, tools sharp and ready, and a planting plan mapped out and waiting. That is the payoff for a few hours of autumn work. For more on getting the spring garden off to a strong start, see our guides on composting, soil testing, and growing tomatoes from seed to harvest.