Introduction
Every week, the average household throws away several pounds of food scraps, coffee grounds, eggshells, and yard clippings. Most of it ends up in landfills where it generates methane, a greenhouse gas far more potent than carbon dioxide. But those same materials hold incredible value for gardeners. Composting at home is the simple, natural process of recycling organic waste into a rich soil amendment that your plants will love.
If you have ever wanted to start a compost pile but felt unsure about the process, this guide is for you. We will cover everything from the science behind decomposition to the practical steps of building, maintaining, and using your own compost. Whether you have a large backyard or a small apartment, there is a composting method that will work for your situation.
By the time you finish reading, you will have the knowledge and confidence to turn your kitchen scraps and yard waste into what gardeners often call "black gold", a dark, crumbly, earthy-smelling material that improves virtually every aspect of your soil.
What Is Composting and How Does It Work?
At its core, composting is simply accelerated decomposition. The same process that turns fallen leaves into rich forest soil happens in a compost pile, just faster and in a more controlled way. Billions of microorganisms, bacteria, fungi, actinomycetes, and larger organisms like earthworms and beetles break down organic matter into its fundamental components.
These microorganisms need four things to thrive: carbon, nitrogen, oxygen, and moisture. When you provide the right balance of these elements, decomposition happens remarkably fast. A well-managed hot compost pile can produce finished compost in as little as four to eight weeks. A neglected pile will still decompose, but it might take six months to a year.
The end product, finished compost, is a dark, crumbly material that smells like fresh earth. It is packed with nutrients and beneficial microorganisms that improve soil structure, increase water retention, feed plants, and suppress diseases. It is, without exaggeration, the single best thing you can add to your garden soil.
Benefits of Composting at Home
Before we get into the how-to, let us talk about why composting is worth your time. The benefits extend far beyond just having nice soil.
Environmental Benefits
Composting diverts organic waste from landfills where it would decompose anaerobically (without oxygen) and produce methane. By composting at home, you are directly reducing your household's contribution to greenhouse gas emissions. The EPA estimates that food scraps and yard waste make up more than 30 percent of what we throw away. That is a staggering amount of material that could be put to productive use instead.
Soil Health and Plant Growth
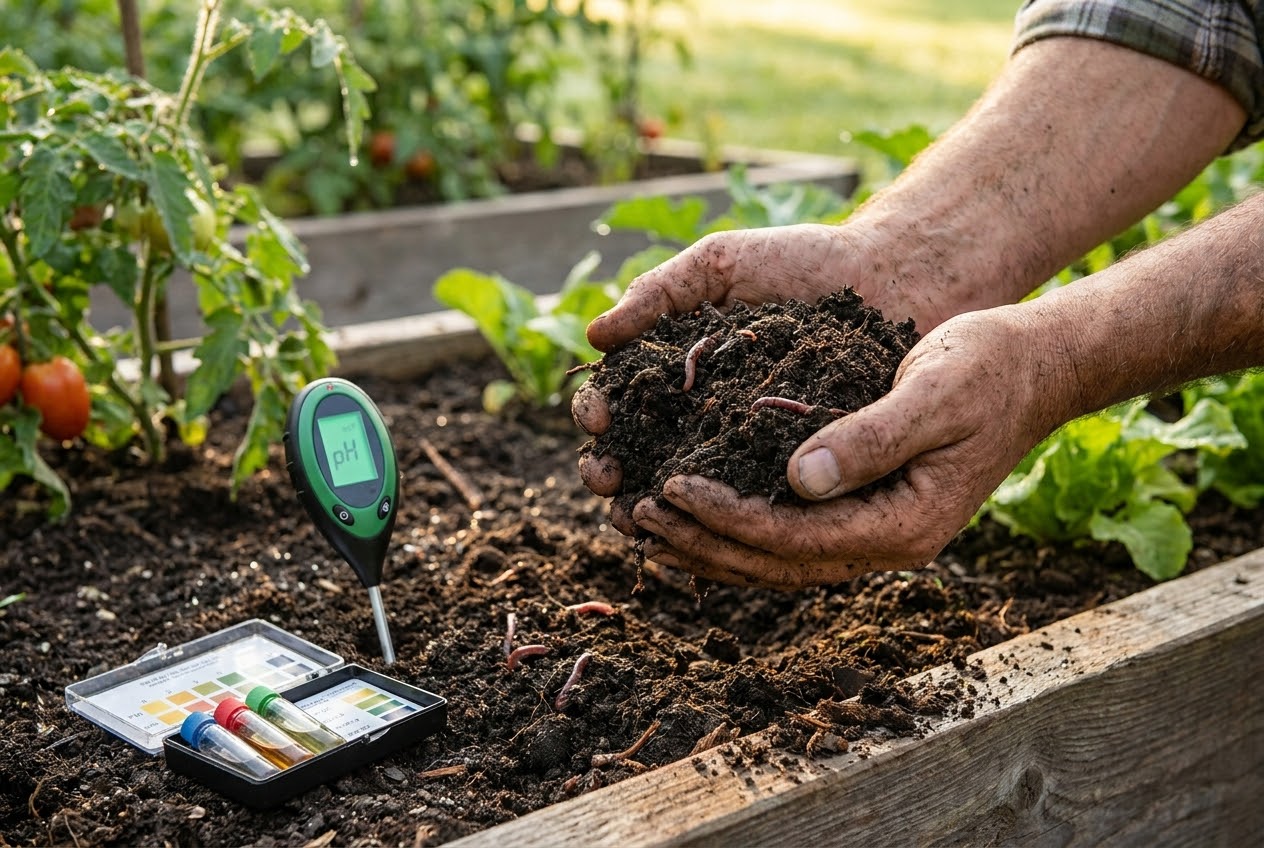
Compost improves soil in ways that synthetic fertilizers simply cannot. It enhances soil structure, making clay soils more friable and sandy soils better at holding water. It introduces beneficial microorganisms that form symbiotic relationships with plant roots, helping them absorb nutrients more efficiently. Compost also buffers soil pH, bringing acidic or alkaline soils closer to the neutral range that most vegetables prefer.
If you are building new garden beds or starting a vegetable garden from scratch, incorporating compost into your soil is the single most impactful amendment you can make.
Cost Savings
Good quality compost sells for $30 to $50 per cubic yard at garden centers. A single household can produce several cubic yards of compost each year from materials that would otherwise go to the curb. Over time, this represents significant savings, especially if you maintain a large garden.
Closed-Loop Sustainability
Composting creates a closed-loop system in your own backyard. Kitchen scraps become compost, compost feeds the garden, the garden produces food, and food scraps go back into the compost. It is a beautiful cycle that mirrors how natural ecosystems operate. For more ideas on living sustainably, see our guide on small changes that make a big impact.
Types of Composting Methods
There is no single right way to compost. The best method for you depends on your space, the amount of waste you generate, and how much effort you want to invest.
Hot Composting
Hot composting is the fastest method and produces the highest quality finished product. A properly built hot compost pile reaches internal temperatures of 130 to 160°F (54 to 71°C), which kills weed seeds and most pathogens. The key is building the pile all at once with the right carbon-to-nitrogen ratio, keeping it moist, and turning it regularly to introduce oxygen.
To build a hot compost pile, layer carbon-rich "brown" materials with nitrogen-rich "green" materials in alternating layers. Aim for a pile that is at least three feet in each dimension, as this volume is necessary to generate and retain heat. Turn the pile every three to five days for the first two weeks, then weekly thereafter. With consistent management, you can have finished compost in four to eight weeks.
Cold Composting
Cold composting is the lazy gardener's approach. Simply pile up organic materials as they become available and let nature take its course. This method requires almost no effort, but it takes much longer, typically twelve months to two years, and the pile will not get hot enough to kill weed seeds or pathogens.
Cold composting is a good option if you do not generate a lot of waste at once or if you do not mind waiting. Just keep adding materials to the top of the pile and harvest finished compost from the bottom. The main drawback is that you cannot compost meat, dairy, or diseased plant material with this method because the lower temperatures will not break them down safely.
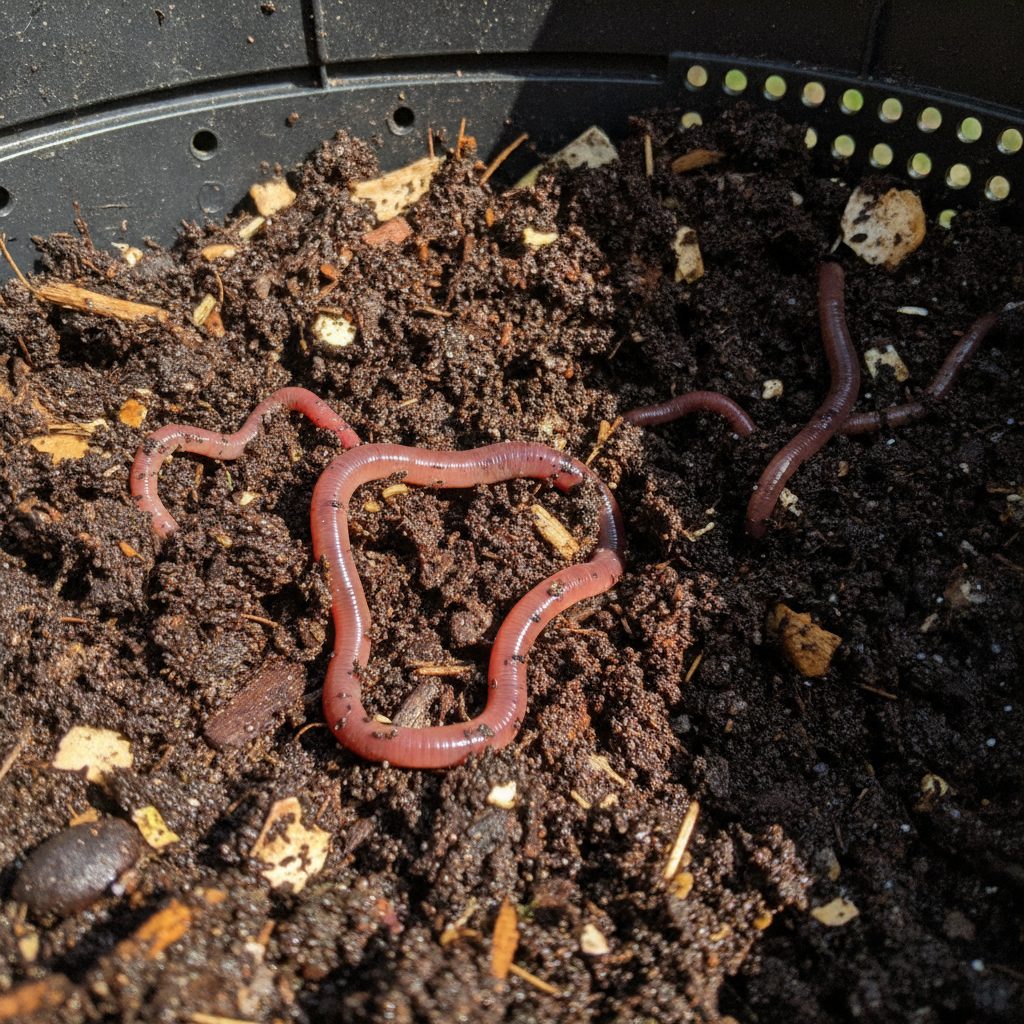
Vermicomposting (Worm Composting)
Vermicomposting uses red wiggler worms to break down food scraps in a contained bin. It is an excellent option for apartment dwellers or anyone without yard space because it can be done indoors with no odor when managed properly. Worms eat their weight in food scraps every day and produce castings that are among the richest forms of compost available.
A basic worm bin can be made from stacked plastic totes or purchased as a ready-made system. Feed the worms fruit and vegetable scraps, coffee grounds, tea bags, and shredded paper. Avoid citrus, onions, and garlic in large quantities, as worms are sensitive to acidic conditions. Our detailed guide on building a worm composting bin walks you through the entire setup process.
Trench Composting
Trench composting involves burying food scraps directly in the garden. Dig a hole or trench about twelve inches deep, add your scraps, cover them with soil, and let the earthworms and microorganisms do the work. This method is invisible, requires no bin or equipment, and adds organic matter exactly where you need it. The downside is that you cannot harvest finished compost separately, and decomposition takes several months.
What to Compost: Greens vs. Browns
The secret to successful composting is balancing two categories of materials: greens and browns. Greens provide nitrogen, which fuels microbial growth and generates heat. Browns provide carbon, which gives the microbes energy and keeps the pile from becoming a slimy, smelly mess.
Green Materials (Nitrogen-Rich)
| Green Material | Notes |
|---|---|
| Fruit and vegetable scraps | Chop into small pieces for faster decomposition |
| Coffee grounds and filters | Excellent nitrogen source; add freely |
| Tea bags (remove staples) | Most tea bags contain microplastics, so loose leaf is preferable |
| Fresh grass clippings | Add in thin layers to prevent matting |
| Plant trimmings | Avoid diseased material |
| Eggshells (crushed) | Add calcium; slow to decompose unless finely crushed |
| Fresh manure (herbivore only) | Chicken, horse, cow, rabbit; avoid dog and cat waste |
| Seaweed and kelp | Rinse to remove excess salt first |
Brown Materials (Carbon-Rich)
| Brown Material | Notes |
|---|---|
| Dried leaves | The most abundant brown material for most gardeners |
| Straw or hay | Excellent for creating air pockets in the pile |
| Cardboard (shredded) | Remove tape and glossy coatings |
| Newspaper (shredded) | Use black-and-white pages only |
| Wood chips and sawdust | Use sparingly; very high carbon content slows decomposition |
| Dried garden plants | End-of-season stalks and stems |
| Paper towels and napkins | Unbleached is best; must be free of grease and chemicals |
| Corn stalks and cobs | Chop into small pieces; cobs are very slow to break down |
The Ideal Carbon-to-Nitrogen Ratio
The ideal ratio for a compost pile is roughly 30 parts carbon to 1 part nitrogen by weight. In practice, this translates to roughly equal parts greens and browns by volume. If your pile smells like ammonia, you have too many greens and need to add more browns. If decomposition has stalled, you probably need more greens.
What NOT to Compost
Some materials should never go in your compost pile, especially if you are using a cold composting method.
- Meat, fish, and bones attract pests and create foul odors
- Dairy products attract rodents and create anaerobic conditions
- Fats, oils, and grease coat other materials and block oxygen
- Pet waste (dog and cat) may contain pathogens harmful to humans
- Diseased plants can spread pathogens back to your garden
- Treated or painted wood contains chemicals that contaminate compost
- Weed seeds unless your pile consistently reaches 140°F or higher
- Charcoal ash contains substances harmful to plants
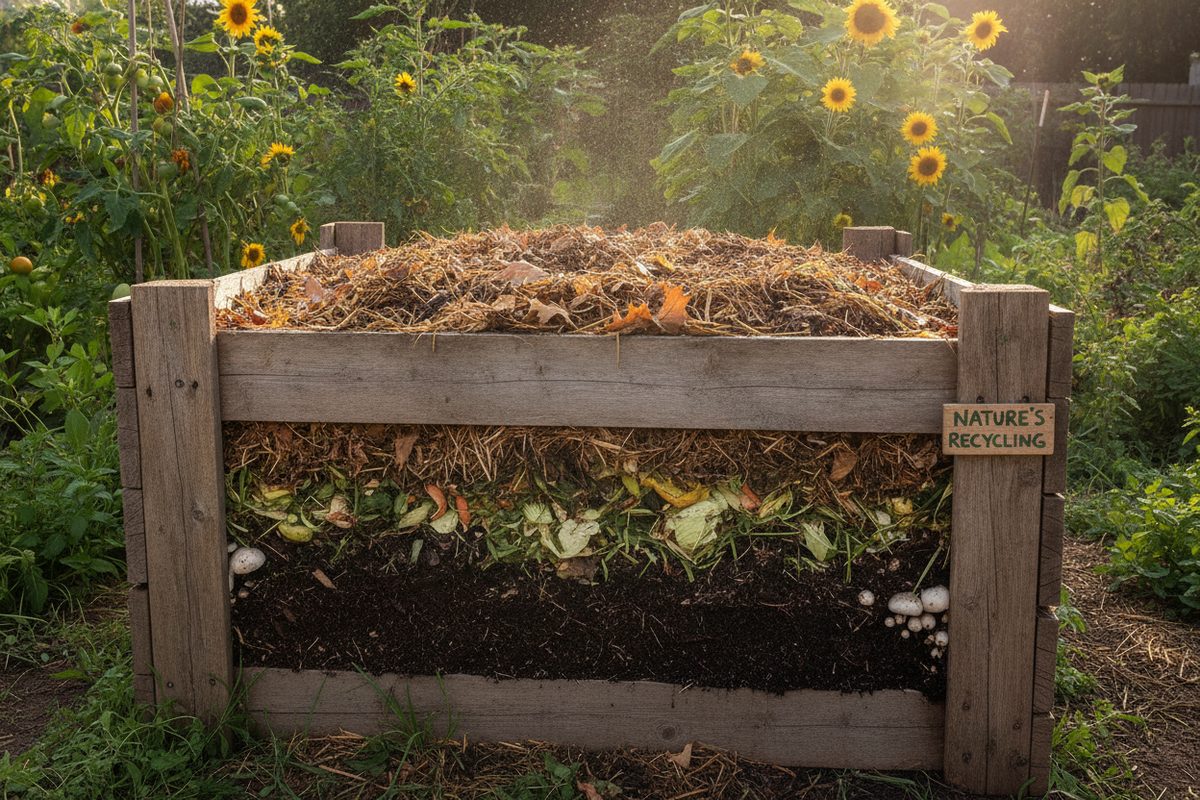
Building or Choosing a Compost Bin
You do not need a fancy bin to compost, but containing your pile keeps it tidy, retains heat, and discourages pests. There are several approaches to choose from.
Simple Wire Bin
A length of hardware cloth or welded wire fencing formed into a circle makes an inexpensive and effective compost bin. It allows excellent airflow and is easy to fill and turn. The main drawback is that it loses heat quickly in cold weather and does not deter determined pests.
Wooden Pallet Bin
Shipping pallets can be screwed together to create a sturdy, free compost bin. Use four pallets to make a square bin, or arrange three in a U-shape against a fence. Pallet bins look rustic but functional, and they provide good insulation for the composting process. Make sure to use heat-treated pallets, not those that have been chemically treated.
Enclosed Plastic Bins
Multi-Bin Systems
A three-bin system is the gold standard for serious composters. One bin holds fresh materials, the second is the active composting pile, and the third contains finished or nearly finished compost. As materials decompose, you move them from one bin to the next. This system provides a continuous supply of finished compost and keeps the process organized.
Step-by-Step: How to Build Your Compost Pile
Regardless of which bin style you choose, the basic process for building a compost pile is the same.
- Choose a level, well-drained spot with partial shade. Full sun dries the pile out quickly in summer. A shady spot under a tree works well.
- Start with a coarse base layer of twigs, straw, or small branches. This creates air channels at the bottom and improves drainage.
- Add a four-inch layer of brown materials such as dried leaves, shredded cardboard, or straw.
- Add a two-inch layer of green materials such as kitchen scraps, grass clippings, or coffee grounds.
- Lightly water each layer as you build. The pile should be as damp as a wrung-out sponge.
- Repeat the layers until the pile is at least three feet tall. The larger the pile, the more heat it generates.
- Top with a thin layer of browns to reduce odors and discourage flies.
- Cover the pile with a tarp or bin lid to retain moisture and heat while keeping out excess rain.
If you are starting from scratch with a new garden, compost should be one of your first priorities. Our guide on how to start a vegetable garden explains how to incorporate compost into new beds.
Maintaining Your Compost Pile
A compost pile is a living system, and like any living thing, it needs regular attention to thrive.
Turning and Aeration
Oxygen is essential for the aerobic bacteria that do the heavy lifting in your compost pile. Without adequate airflow, the pile switches to anaerobic decomposition, which is much slower and produces unpleasant odors. Turn your pile with a garden fork every one to two weeks. Mix the outer edges into the center and bring the center material to the outside. If you cannot turn the pile, at least poke deep holes in it with a pitchfork or aerating tool to introduce some oxygen.
Moisture Management
The pile should stay consistently moist but not waterlogged. The "squeeze test" is the easiest way to check: grab a handful of compost and squeeze. If a few drops of water come out, the moisture level is right. If water streams out, it is too wet and you should add dry browns and turn the pile. If no water comes out and the material crumbles, it is too dry and needs water.
Temperature Monitoring
A compost thermometer is a worthwhile investment if you want to optimize your process. Active hot composting piles should reach 130 to 160°F (54 to 71°C). When the temperature drops below 100°F (38°C), it is time to turn the pile and add fresh greens if needed. After the pile has gone through two or three heating cycles and the temperature stabilizes near ambient, the compost is nearly finished.
Common Composting Problems and Solutions
| Problem | Likely Cause | Solution |
|---|---|---|
| Pile smells like ammonia | Too many greens (excess nitrogen) | Add brown materials and turn the pile to introduce oxygen |
| Pile smells like rotten eggs | Anaerobic conditions (too wet, not enough air) | Turn the pile, add dry browns, improve drainage |
| Pile is not heating up | Too small, too dry, or not enough nitrogen | Build pile to at least 3x3x3 feet, add water, add green materials |
| Fruit flies and gnats | Exposed food scraps | Bury new scraps under a layer of browns, cover the pile |
| Rodents and raccoons | Meat, dairy, or exposed food waste | Use an enclosed bin, avoid prohibited materials, bury scraps deep |
| Matted, slimy layers | Grass clippings or leaves added too thick | Break up mats, mix with browns, add in thinner layers |
| Decomposition is very slow | Large pieces, wrong ratio, or cold weather | Chop materials smaller, adjust greens/browns, insulate pile in winter |
| Ants in the pile | Pile is too dry | Add water and turn the pile; ants prefer dry conditions |
If you run into persistent issues, our dedicated article on composting troubleshooting covers even more solutions in detail.
When Is Compost Finished?
Finished compost is dark brown to black in color, crumbly in texture, and smells like fresh forest floor. You should not be able to identify the original materials, although some stubborn items like avocado pits or corn cobs may still be recognizable. The pile will have shrunk to roughly one-third of its original volume.
A simple maturity test: fill a zip-lock bag with compost, seal it, and leave it at room temperature for 24 hours. When you open it, if it smells sour or like ammonia, the compost needs more time. If it smells earthy and pleasant, it is ready to use.
Using Finished Compost in Your Garden
There are several ways to put your finished compost to work.
Soil Amendment
Mix two to four inches of compost into the top six to eight inches of garden soil before planting. This is the most common use and the one that provides the greatest benefit. Compost improves soil structure, water retention, drainage, and nutrient content all at once.
Top Dressing
Spread a half-inch to one-inch layer of compost around established plants without working it in. Earthworms and microorganisms will gradually pull it down into the soil. This is an excellent way to feed perennial beds, fruit trees, and lawns.
Potting Mix Ingredient
Mix compost with perlite and coconut coir or peat moss to create a rich potting mix for containers. A typical ratio is one part compost, one part perlite, and one part coir. This mix provides nutrients and excellent drainage for container plants.
Compost Tea
Steep a burlap bag full of compost in a bucket of water for 24 to 48 hours, stirring occasionally. The resulting "tea" can be used as a liquid fertilizer applied directly to plant foliage or soil. While scientific evidence on compost tea's benefits is mixed, many gardeners swear by it.
Mulch Substitute
A thin layer of compost around plants suppresses weeds and slowly releases nutrients as it continues to break down. Unlike wood chip mulch, compost actually feeds the soil as it decomposes.
For more information on how compost and other mulches compare, read our article on choosing the right mulch for every garden area.
Composting Through the Seasons
Spring
Spring is prime time for composting. Turn your winter pile to reactivate it as temperatures warm. Begin adding the fresh greens that are suddenly abundant: kitchen scraps, early lawn clippings, and thinning from the garden. Apply finished compost to beds as you prepare for planting season.
Summer
Hot weather accelerates decomposition but also dries out piles quickly. Monitor moisture levels closely and water the pile if needed. Fruit flies may become more active, so bury kitchen scraps well under browns. If you are also harvesting rainwater, the collected water is perfect for keeping your compost pile moist.
Fall
Fall is the best time to stockpile brown materials. Fallen leaves are carbon gold and are available in abundance. Stockpile bags of dry leaves next to your compost bin so you have a ready supply of browns all winter. This is also a good time to harvest finished compost and apply it to beds before winter.
Winter
Decomposition slows dramatically in cold weather, but it does not stop entirely. Insulate your pile with straw bales or a thick layer of leaves to retain heat. Continue adding kitchen scraps, burying them deep in the center of the pile. The pile will reactivate quickly when spring arrives.
How Much Compost Can You Make?
A typical household generates enough kitchen scraps and yard waste to produce several cubic yards of compost per year. A family of four can produce roughly one cubic yard of finished compost every three to four months from kitchen scraps alone. Add in yard waste from mowing, raking, and pruning, and you could easily produce four to six cubic yards per year.
That is more than enough to amend a substantial vegetable garden, feed a dozen raised beds, and top-dress a lawn. The exact amount will vary based on your household size, eating habits, and yard size, but most gardeners find that they produce more compost than they can use.
Frequently Asked Questions
How long does it take to make compost?
It depends on the method. Hot composting with regular turning can produce finished compost in four to eight weeks. Cold composting takes twelve months to two years. Vermicomposting produces usable castings in three to six months. The key factors are pile size, carbon-to-nitrogen ratio, moisture, and how often you turn it.
Can I compost if I live in an apartment?
Yes. Vermicomposting is the best option for apartment dwellers. A compact worm bin fits under a kitchen sink or in a closet, processes several pounds of food scraps per week, and produces no odor when properly managed. Bokashi composting is another apartment-friendly option that uses fermentation to break down food waste, including meat and dairy.
Will composting attract pests to my yard?
Properly managed compost piles rarely attract pests. The key is to never add meat, dairy, or oily foods to an open pile, always bury food scraps under a layer of browns, and use an enclosed bin if rodents are a concern in your area. If pests do become a problem, switching to a tumbler-style bin that sits off the ground usually solves it.
What is the best compost bin for beginners?
For most beginners, a simple enclosed plastic bin or a tumbler composter offers the best balance of ease, cost, and effectiveness. Tumbler composters are particularly beginner-friendly because they make turning effortless and keep pests out. If budget is a concern, a wire bin made from hardware cloth costs almost nothing and works well.
How do I know if my compost is good quality?
Good compost is dark, crumbly, and smells earthy. It should pass the "squeeze test" (moist but not soggy) and the "bag test" (no sour smell after being sealed for 24 hours). You should not be able to recognize the original materials. If you can still see identifiable food scraps, the compost needs more time to mature.
Conclusion
Composting at home is one of those rare activities that benefits you, your garden, and the planet all at the same time. It reduces waste, saves money on soil amendments, and produces a product that is genuinely superior to anything you can buy at a store. Whether you choose a simple pile in the corner of your yard, a tidy bin on your patio, or a worm bin under your kitchen sink, you are making a meaningful contribution to a more sustainable lifestyle.
The most important step is the first one. Start collecting your kitchen scraps, gather some brown materials, and build your first pile. It does not need to be perfect. Nature has been composting for billions of years and does most of the work for you. All you need to do is set the conditions and get out of the way.
Once your compost is ready, use it to enrich the soil in your vegetable garden, raised beds, or indoor herb garden. Your plants will reward you with stronger growth, better yields, and fewer pest and disease problems. Happy composting.
Emma Richardson
Emma Richardson is a passionate home gardener and sustainability advocate with over a decade of hands-in-the-soil experience. She writes practical guides to help people grow their own food and live more sustainably, no matter their experience level or available space.
View all articles →Related Articles